
Lighting Subjects
There are a variety of ways to light your subject matter and it's often your preference that makes a painting uniquely yours. How the light falls on an object is important - it describes that item in 3 dimensions. I cannot say there is a right or wrong way to illuminate your reference but there are a few options to be conscious of like the amount of lights you are using, the position of the light, and difference between hard and soft light.
Quantity of Lights
In the world of TV, film, and photography it is common to use many light sources to illuminate a subject. For example your local TV news anchor probably has at least three; two from the right and left side for an even, shadow-less appearance on their face and one from above to light the top of their head so it will contrast from the background. When I compose a still life, I use only one light source. Its the simplest way for our brains to render an object in 3 dimensions - consider that for thousands of years our ancestors only had one light, the sun, for them to see objects.
Below are a couple of photos of a golfing bear to show the difference between one and two light sources. Typically, its rare to find any old master's paintings using more than one light; in fact I can't name any. If you look at Vermeer's work, many of his subjects are illuminated by a single large window, often included in the painting itself. In my opinion, a single light allows the viewer to better understand the contour and shape an item. A couple areas to pay attention are the bear's cheek and left arm. In the single light source image you can more easily determine the contour of the shape. Much of representational painting is about how well you can describe an object with paint, and correctly lighting it is the first step. You want to avoid overly complicated lighting. Remember the phrase K.I.S.S. Keep it simple stupid.
Below are a couple of photos of a golfing bear to show the difference between one and two light sources. Typically, its rare to find any old master's paintings using more than one light; in fact I can't name any. If you look at Vermeer's work, many of his subjects are illuminated by a single large window, often included in the painting itself. In my opinion, a single light allows the viewer to better understand the contour and shape an item. A couple areas to pay attention are the bear's cheek and left arm. In the single light source image you can more easily determine the contour of the shape. Much of representational painting is about how well you can describe an object with paint, and correctly lighting it is the first step. You want to avoid overly complicated lighting. Remember the phrase K.I.S.S. Keep it simple stupid.
However, the negative side to using a single light source is very dark shadows. You may be tempted to use two lights just to lighten the darker side of the subject- I know I was when I first started composing still lifes. One simple technique to have your cake and eat it too is using reflective light. All you need is a white panel or sheet on the opposite side of your light source. Below are a couple images using this approach. Notice the contrast is more subtle and the shadow is much lighter. As you can see the white panel stops the light from escaping into the far background. The light source illuminates the white panel and the light reflects into the dark areas of the subject and it's shadow. This works because white doesn't absorb light, it reflects it. By using white, you maximize the amount of potential light that can be reflected.
Position of Light
|
|
Positioning light on your painting subject is another way an artist can modify the appearance of a painting. In most cases, as long as the light is able to describe the contour shapes of an object and provide a visible cast shadow, it will work. Your main objective is to find the right angle of light in which the items look their best; there is no right answer by the way, only opinion. Below are some examples of different lighting angles on a still life of tools. All of them are acceptable except for one. See if you can guess.
|
I could have labeled the direction of the light for these seven images, but then you wouldn't have the fun of figuring it out yourself. If you tried to guess which image doesn't have a suitable direction of light, its image four. The light in fourth image is coming from directly behind the camera, simulating the results of an on-camera flash. What makes this image lifeless is the lack of shadows. You still have a sense that the tools exist in 3-D, but not a strong one. The problem is our are eyes cannot see nearly any of the shadows cast by the tools, nor the shadows on the tools themselves produced by their contours; its the result of the light source being in the same place as our line of sight. This puts the transition of light to dark occurring on the objects out of sight - a loss of information. Also, the lack of cast shadows is just plain boring. While this type of lighting can be useful if you need to document an item, it makes for lackluster art and should be avoided.
Hard Light vs. Soft Light
The difference between hard and soft can greatly influence the appearance of the painting. Below I have included two images an old safety razor. One taken with hard light, and the other soft light. Both images were photographed with the light sources at the same angle.
The determining factor of a hard and soft light is the relative size of the light source compared to an object. When the light source is small, you can achieve quite a bit of shadow detail cast by the object. On the other hand, when the light source is large, the light falls around the object much more allowing the shadow to have a more gradual transition into the lighter surroundings.
In my work I exclusively use soft light to illuminate my subjects. Hard light has its uses, but since the still life objects is my work receive hard, crisp edges, I prefer to compliment them with soft shadows. I also prefer a minimal amount of shadow detail, which can distract from the object.
|
|
If you are wondering which type of shadow is more difficult to paint, they both are a challenge. The hard light shadow is always more intricate because it retains much of the shape of the object. If the shape of the item is fairly complex like the razor, so will the shadow created by the hard light. Painting the contour of this type of shadow is tricky because of the numerous sharp turns it makes and maintaining a consistent, subtle, soft edge is not easy. In comparison, soft light will simplify the shadow's detail, but will not save you any time painting it. Creating a soft, flawlessly blended shadow is a challenge in itself. You must make several passes with a brush over the shadow edge to smooth it out. It takes a delicate touch to remove all the brush marks from it. The slow drying time of oil paint can really be appreciated in this application.
Hard light with a small light source is easy to attain. Any regular sized light bulb will create hard light with a lot of shadow detail. With soft light you need an intense, bright light(s) in a large reflector. After a lot of research for the perfect soft lamp, I decided I have to make my own. Below are a few photos of it. |
As a precaution, DO NOT ATTEMPT BUILDING YOUR OWN LAMP UNLESS YOU HAVE KNOWLEDGE OF ELECTRICITY AND WIRING. FAULTY WIRING CAN BE FATAL!
|
In the past I built a lamp from a 12" deep frying pot capable of 300 watts and 6000 Lumens, but in my pursuit of something bigger and better, I designed this monster above. It takes a small but mighty 500 watt halogen bulb that produces 10,000 lumens. Since it operates at such a high temperature it needs a protective screen incase the quartz envelop fails. Some of you may recognize the large reflector - its a 16" Chinese wok. It just so happened that this cooking pan was a perfect surrogate for a lamp reflector. Then, by using a 20" x 20" cloth diffuser, it is capable of producing some beautiful lighting.
However, using such a high powered lamp has it drawbacks. It gets really hot and heats up a small room fairly quickly, especially in the summer. My solution to this problem was to build a small stomp box light switch. It sits on the floor and is plugged in between the wall and lamp.
When I'm painting, I'm not always looking at my still life so there isn't a need to keep a constant light on it. With this small box I can turn the lamp on and off as I please. It has two switches that allows current to pass through to the 500 watt lamp. One is a momentary switch (red) for quick glances at the still life and the other a basic on/off switch for those longer durations of time when I need the light on. The wiring is rather simple but again, do not attempt any of this yourself unless you know what you are doing.
|
500 Watts of Soft Light
|

|
If you are interested in a stomp box light switch for your studio light but cannot make it yourself, you might be able to buy one. I found this floor switch on Ebay. I also found similar products searching "Outlet Extension Cord with Foot Switch" on Google. However, I don't know how long it will last. Its only $6.99 on Ebay so the switch may not hold up to heavy use in the studio. Nevertheless, for the price, its worth a shot.
|
Using a Diffuser
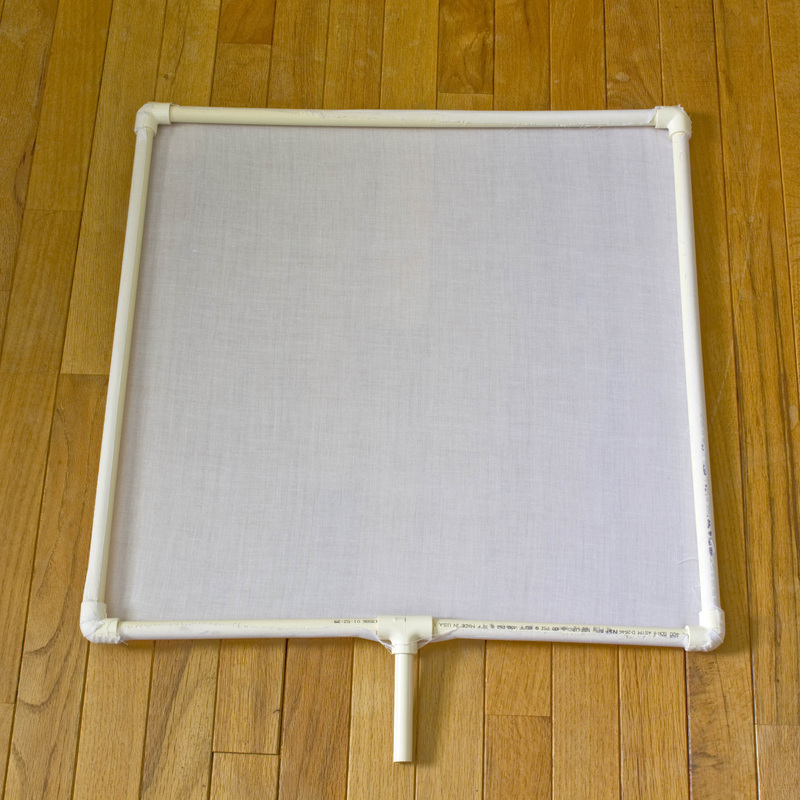
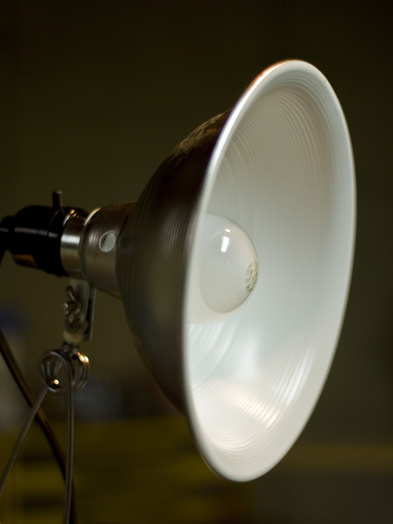
A diffuser is a must when using a light source that produces an uneven illumination. If your light source has a reflector like this simple clamp light to the right, you need a diffuser.
|
|
A diffuser is a device that spreads light out evenly. It can be made from frosted glass, white plastic, fabric, paper, etc.; anything that will effectively scatter light. I made mine from white cotton fabric and 1/2" PVC pipe. The fabric is stretched over the pipe and secured with super glue.
|
|
The lack of a diffuser is most apparent in the shadows. Below are two images that show the difference of using a clamp light with and without a white fabric diffuser.
|
|
While the reflector can increase the size of the light source, it can also create uneven illumination, which is the case with the clock shadow. Refer to the example to the left. The light emitted by the bulb itself is much brighter than light bounced in the reflector. The direct light from the bulb falls over the object and creates a shadow. At the same time, light from the bulb reflects into the reflector, loses some brightness and then escapes from the reflector and land onto the object. However the light bounced by the reflector, which is dimmer, falls over the object from a slightly different perspective creating another shadow. It appears to be detached and separate from the initial shadow from the bulb because of uneven light distribution from the area occupied by the light source (both bulb and reflector).
Notice that not much has changed except for the shadow of the clock. However a shadow can tell you a lot of information about the light source and subject; how bright the light is, the size of the light , the angle of the light, and the object's distance from the ground or wall. But when there are strange double shadows occurring, it doesn't look natural. Anything that appears odd in the shadow can be confusing about how the light falls over it's subject. Without a diffuser, these double shadows can sometimes appear. The images of my Stones clock demonstrates this. But with the fabric diffuser between the light and the clock, the double shadow blends together. While this small detail may not be a concern for some people, I find it important.
|
