
Photographing art
This is often a commonly asked about topic and what the correct procedure is to getting a good photo of your painting. Because oil paintings typically have a glossy surface if varnished, it's difficult to photograph them. The light source used to illuminate the painting will almost always reflect off the surface resulting in a low contrast photo. Also, if the painting is not varnished, chances are that there will be some variation between surface sheen, either matte or gloss. In this case the matte areas will appear "sunken-in" and again will cause low contrast and poor color saturation. In this page I will share my technique to remove all reflections from the painting surface, bring colors up to their full saturation, and how to set up the camera for sharp, good contrast images; all of which can be accomplished whether or not the painting is varnished.
Camera and lens
I'll start by going over the equipment needed. First is a DSLR camera. DSLR stands for Digital Single Lens Reflex. These cameras have interchangeable lenses and are ideal for giving you the best image. Simple point and shoots will only take you so far. The good news is that you don't have to break the bank for a DSLR these days. Entry level models in the $500 range when used correctly, with a decent lens, will provide results that rival pricier models 3 or 4 times the cost. I'm currently using a Canon T2i and I'm still surprised at the images it produces.
The other advantage to using a DSLR to photograph your art is being able to edit them in a RAW file rather than a jpeg. DSLRs will give you an option of shooting in RAW, jpeg, or both. Cameras like the average point and shoot convert images immediately into compressed jpeg files so they take up less space on a memory card. However, compressing a file means it removes information about the image. So if post processing or editing to the image is needed to alter colors or values, less information will exist in the compressed jpeg file to make those adjustments. The larger RAW file will allow greater options and yield better results for editing an image. Once the alterations have been made to the RAW file, it can then be converted to a jpeg file.
The next important piece of equipment is the camera lens. They can sometimes cost as much or if not more then the camera. Often lower cost models will come with a kit lens, usually a 18 - 55mm zoom, but for our purpose of photographing a painting, I recommend a prime lens. A prime lens, unlike a zoom lens, is a fixed focal length lens, meaning that there isn't a zoom feature. If you want a closer image of your subject, you must physically move the camera closer. The benefits to the prime lens is image quality. They are usually sharper and have less distortion and less chromatic aberration - everything we need for a great photo of our painting. If you are relatively new to the world of photography, I'll explain what these terms mean.
Sharpness
|
A sharp lens will provide sharp images. Not all camera lenses are created equal and most vary greatly in how sharp they can produce an image. Sharpness in terms of camera lenses translates into contrast. The sharper a lens can render an object, the better the contrast will be in the image.
The sharpest images are only possible by using a stable tripod. Its impossible to hand-hold the camera steady to accurately compose a shot of a painting. This is especially true when the camera requires a long exposure time, such as 1 or 2 seconds. The method and step-up I will demonstrate will require a long exposure time. |
Camera in live view
|
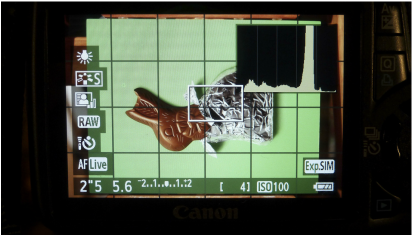
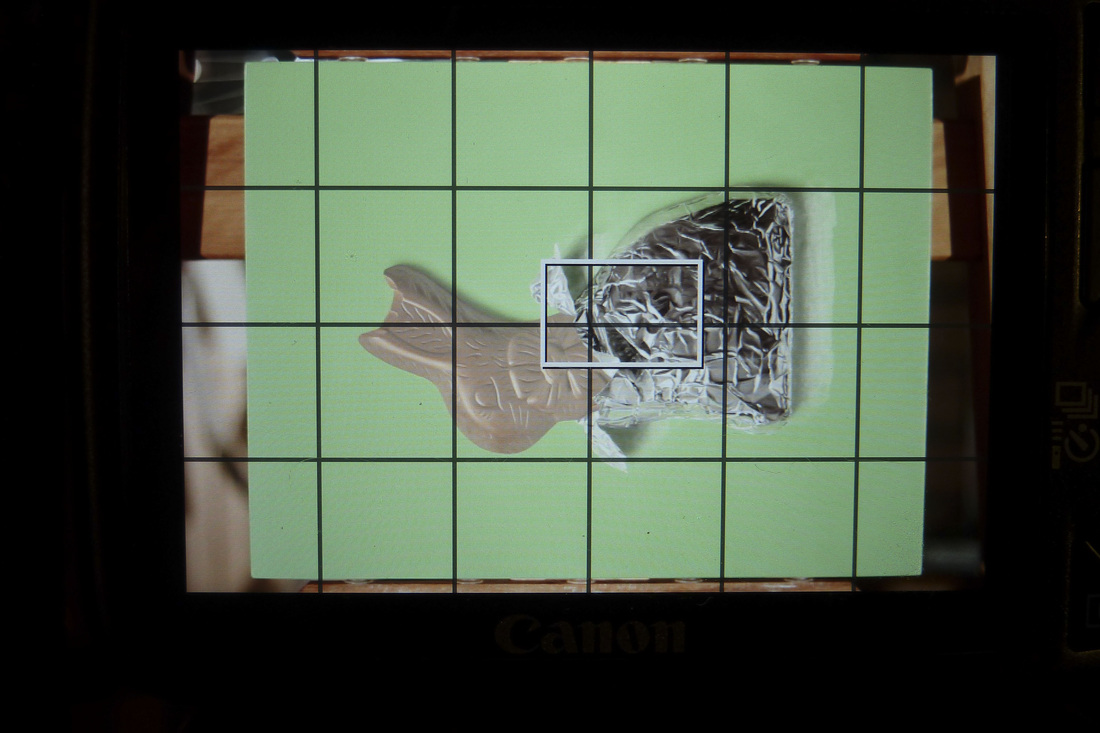
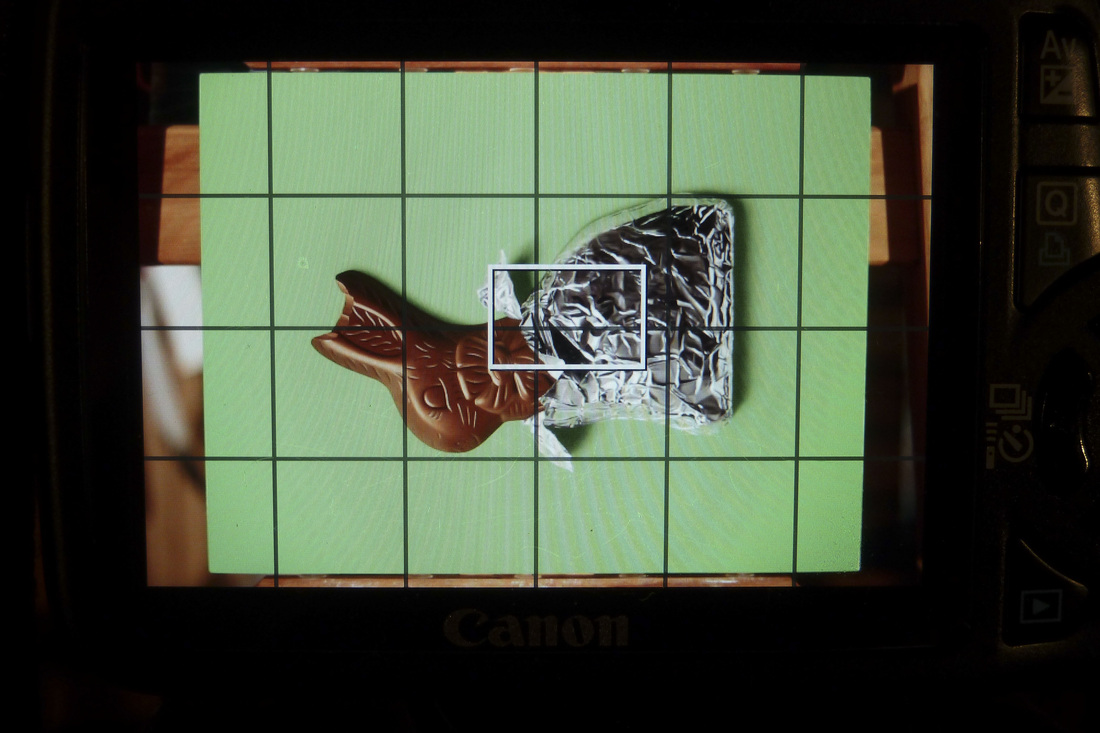
Another factor to achieving a sharp image is focus. Focusing the image will be made easier now that the camera is on a sturdy tripod. Usually the camera does a pretty good job with auto - focus, but I still prefer to manually focus the lens; that way I know the image will be tack sharp. The best way to manually focus a digital camera is to set the camera to live view, digitally zoom into the frame and adjust the focus ring until the image appears as clear as possible. Focusing is made easier and more accurate if you zoom into an area of the image where there is contrast and sharp lines.
|
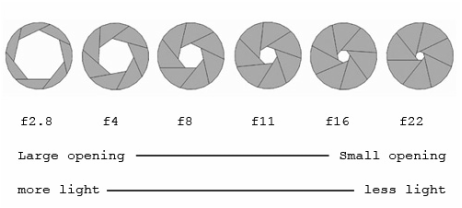
The last step to attaining a sharp image is using the lens's aperture sweet spot. The aperture or F-stop as it's called, determines how much light passes through the lens to the camera's sensor. It's simply a circular diaphragm that expands and contracts inside the lens body. Refer to the image to the left.
|
A large opening means more light will pass through and allow for a quicker exposure time. The negative side to a larger aperture is that the image will likely have vignetting in the corners and will almost always be a bit soft or un-sharp. You will also experience soft images with very small apertures too. This is the reality of lens optics. However, every lens has a sweet spot usually between f/5.6 and f/8. These are often the apertures where a lens will preform at its best. Below are images demonstrating lens sharpness at different apertures. The images are cropped to just the very center of the frame. I'm using an 18 megapixel Canon T2i with a Canon 50mm f/1.8 lens*. The first image is taken at f/1.8, then f/5.6, and finally f/22.
* Lens are identified by their focal length in millimeters as well as its largest possible aperture.
* Lens are identified by their focal length in millimeters as well as its largest possible aperture.
Distortion
|
Large amounts of distortion from a lens can impact any image with long straight lines. It can make straight lines, such as those in architecture, appear to bend. If distortion is apparent in a photo of a painting, the error may be blamed on the artist for not being able to paint a straight line - nothing an artist wants to be known for.
The two main types of distortion are barrel and pincushion. Refer to the image on the right. Barrel distortion is more likely to show up in a wide angle lens such as something less the 50mm - Pincushion in mostly long focal length lenses greater than 50mm. Prime lenses tend to have less distortion than zoom lenses making them more favorable for the application of documenting artwork. Some zoom lenses may experience barrel distortion at shorter focal lengths, pincushion at longer focal lengths, and somewhere in the middle, zero distortion. If you must use a zoom lens to photograph art, locate the focal length on the lens where the least amount of distortion occurs. This can found by photographing a grid pattern such as bathroom tile or exterior bricks. |
|
|
|
Chromatic AberrationChromatic aberration is color fringing that occurs on sharp edges between areas of high contrast. The colors can vary but the example image below shows both magenta and cyan fringing. These dark branches against a bright sky is probably one of the best real world scenarios to test for chromatic aberration. This flaw in optics is usually worse in a lens's largest apertures and can sometimes diminish a great amount in smaller apertures - of course all lenses will perform differently.
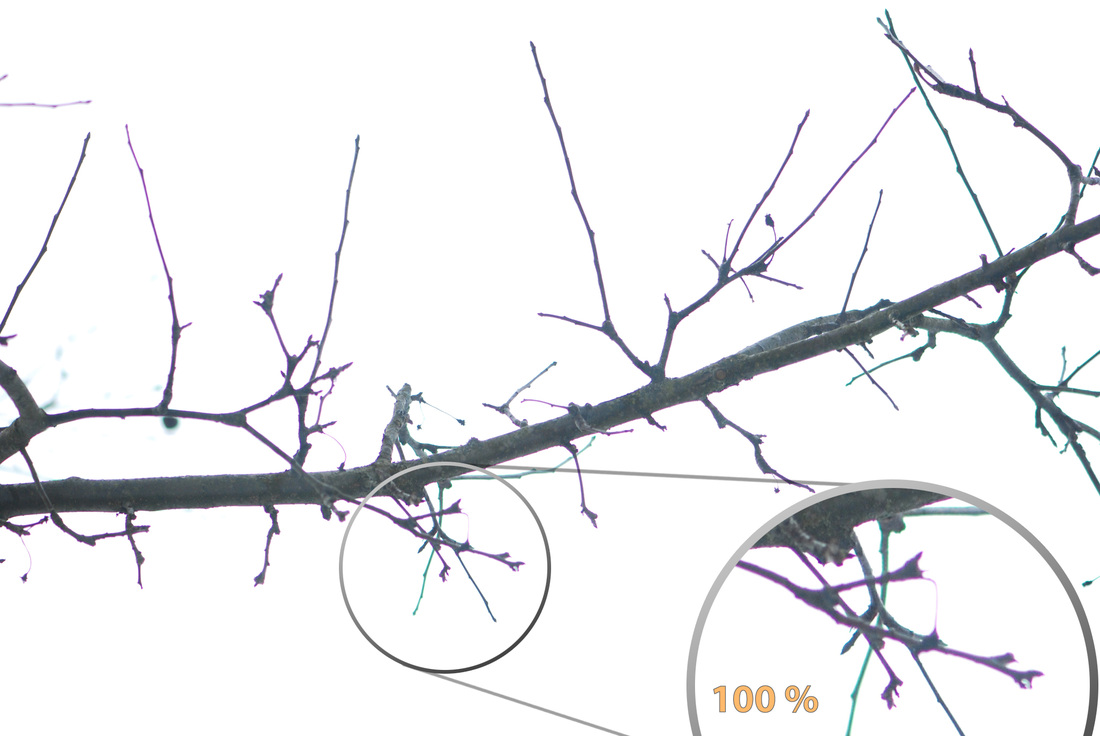
Example of Chromatic Aberration
|
Now that I've covered some of the details about camera lenses, you may feel overwhelmed choosing a good one. Luckily there are a few websites devoted to testing and evaluating camera gear including lenses. These provide detailed information and easy to read graphs on how sharp a lens is, the amount of distortion, and any chromatic aberration. There are a few on my favorite links below.
Unfortunately, lenses can be one of the most expensive parts of photography. If you are on a budget, and who isn't?, the Canon 50mm f/1.8 STM lens is tough to beat. This little lens can be purchased for a little over a hundred dollars and will create some very sharp images once stopped down past f/2.8. At f/5.6, it's corner to corner sharpness can compete with even the most expensive lenses. Check out this test at f/5.6, $125 Canon 50mm 1.8 STM vs. $4,000 Carl Zeiss 55mm f/1.4 Otus Distagon. Nikon also has a budget 50mm lens that performs well.
Lastly, any focal length lens can work for photographing art. A short focal length like 24mm is a wide angle lens and will require you to move closer to the subject to fill the frame. It will also make distant objects far away appear smaller than how we would naturally see them . Conversely, a telephoto lens like a 135mm will have you standing far back, but objects in the background will appear larger and closer. The normal or standard lens is considered around 50mm because it behaves closest to the human eye when seeing objects in depth. Regardless, any of the attributes from either type of lens will not influence the appearance of a flat surface such as a painting.
Lights
|
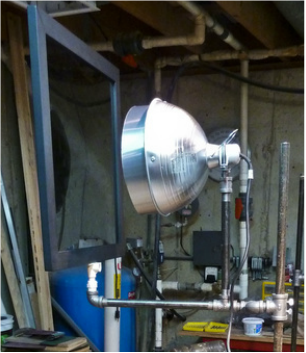
The easiest and simplest lights to use are good old incandescent lamps. They produce a great, predictable illumination that all cameras can adjust for. I've had success using two 300 watt utility lamps I purchased at the hardware store for a few dollars a piece. Although recently I have been using two 75 watt PAR Flood lamps.
I also made a couple light stands using black plumbing pipe. The base of the lamp socket is held to the black pipe using an exhaust clamp. If you decide to use the high wattage bulbs, be sure the socket and reflector can tolerate the heat and current flow. |
|
Polarizing Filters
|
With camera gear and lighting described, I can talk about polarizing filters and why they are useful for photographing art. As I proclaimed in the beginning of this page, oil paintings are difficult to photograph due to either a glossy surface or sometimes an inconsistent overall sheen. Fortunately, all these problems can be eliminated by using polarizing filters in front of the camera lens and lights. They are a sort of little known secret weapon to achieving the best possible image.
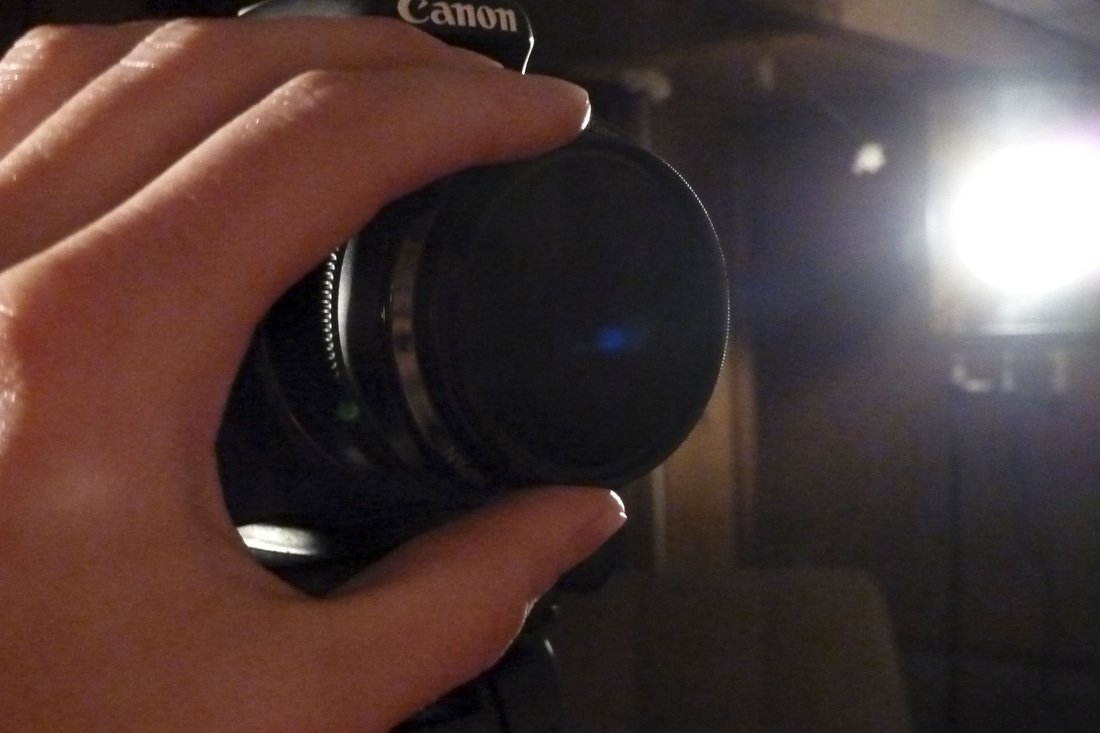
A polarizing filter is used in photography to remove reflected light and glare and to saturate colors. For example, they can effectively eliminate reflections off water and make skies more blue. In our case, we will be using the filters for the same purpose. They are going to rid the painting of surface glare as well as saturate the colors to their fullest extent no matter if the painting is varnished or not. The filters will also allow you to photograph any art framed with glass. My camera to the right has a circular polarizing filter on my 50mm lens. This filter comes in many sizes to accommodate all lenses. It attaches by screwing directly on threads on the front element. It's called a circular polarizer because the front piece on the rotates to allow a varying amount of polarized light to the camera sensor. For our purpose we want to rotate it to block the maximum amount of reflected light. Note that some camera lens's front element rotates as it focuses; mainly older designs. While its not impossible to use a circular polarizes on these types of lenses, you must focus the lens first, then adjust the filter. |
|
If you can save money by building your equipment, then by all means do so, but everything you need such as light stands, filter holders, brackets, clamps, and lamp reflectors can be purchased at a photo store such as B&H Photo Video .
|
The other required polarizing filters needed to eliminate all reflections from the art's surface come in sheets off a roll, usually called a linear polarizer. The best place I've found to purchase it at a good price is from http://www.polarization.com/polarshop/product_info.php?cPath=21&products_id=28. It is 17" wide and sold by the foot. Unfortunately, it is up to you to cut it and frame it so it can placed in front of the lights.
The image to the left shows my home made light stand with the polarizing filter placed in front of the reflector so the light will shine through to illuminate the painting. I made my filter holders sort of similar to a window. Its constructed from 1"by 2" pieces of pine and 2 pieces of clear sheets of acrylic in which the polarizing filter is sandwiched between. It attaches to the lamp stand with a 1/2" PVC elbow with mounting holes. I was careful to mount it far enough away from the light to prevent any melting or burning. There are some more photos of it below. |
Results from using polarizing filters
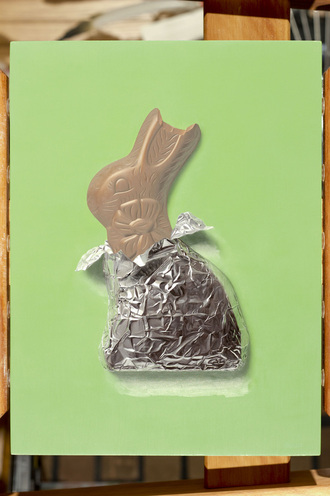
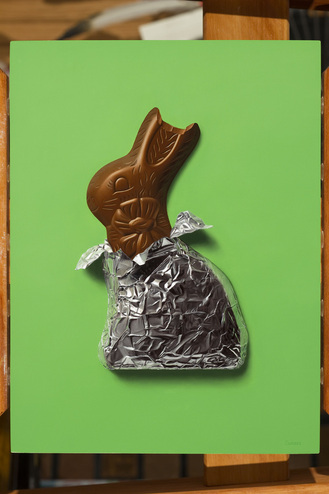
These two images below show the benefits of using the polarizing filters. This painting had just been completed and was not varnished. I used a mix primarily composed of burnt umber for the chocolate, and as we know, burnt umber can dry pretty darn matte. In the left photo, you can see what the painting looks likes without polarizing filters. You can even see reflected light in some of the horizontal brush marks. The photo taken using the filters yields much more pleasing results. The polarizer effectively removes all reflections from the painting's surface giving it the appearance that it was just varnished. The photo now shows the true value, color, and contrast of the painting. In addition, if you are photographing a very glossy painting, the filters will remove any glare from the surface.
|
|
As mentioned earlier, you need filters for the lights as well as the camera lens. They work together so removing any of the filters will prevent you from achieving good results. The only application polarizing filters may not be preferable, in my opinion, is when photographing paintings with thick, heavy brush marks or textures where it becomes a vital part of the art. These are works of art we typically want to see the reflections on peaks of the painted surface. Although, you may still want use the filters just to lessen the amount of reflected light.
Setting up the shot
|
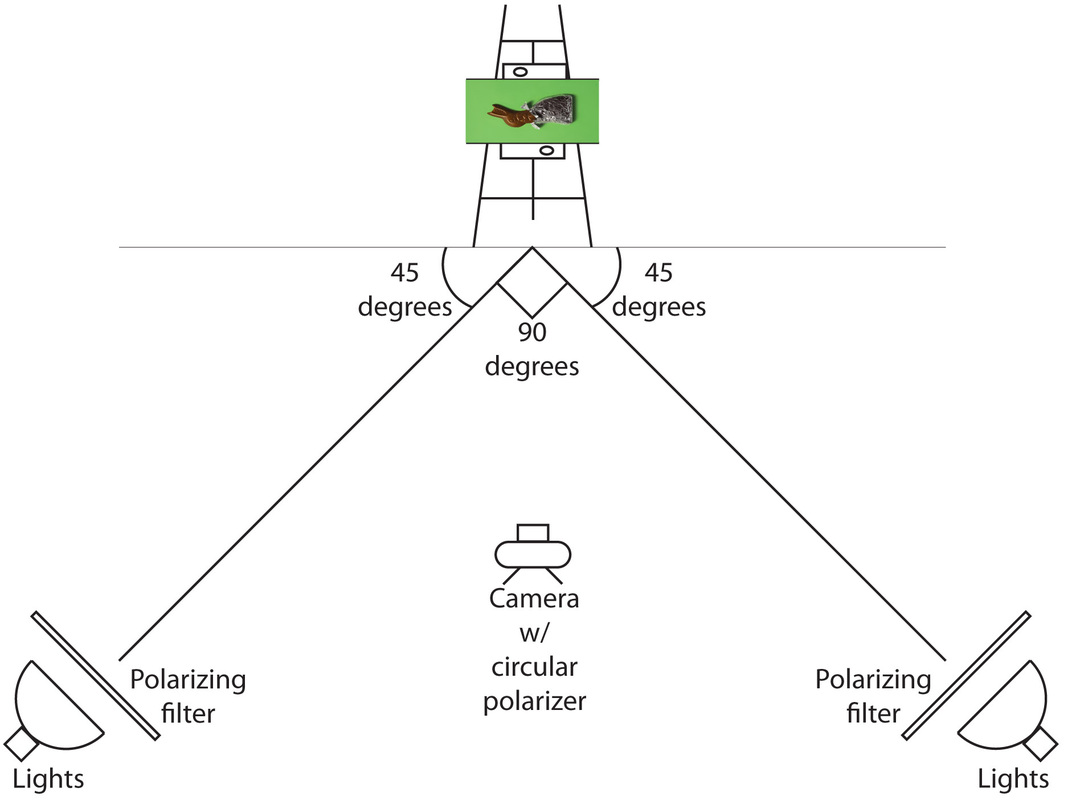
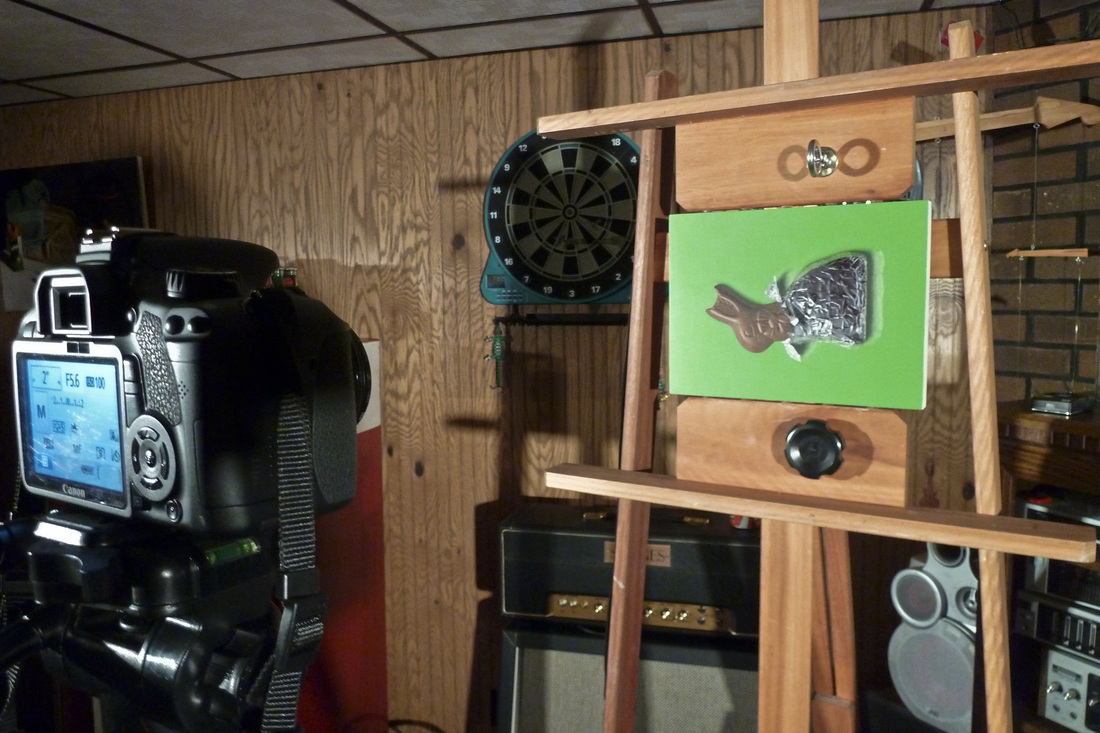
Setting up the shot is relatively simple. The sample shown to the right shows the placement of all the equipment I covered above. One additional item needed is an easel to hold the painting. It also helps to use a level tool to square up the easel, painting, and filters. The polarizers on the lights are linear so be sure they are both oriented the same way.
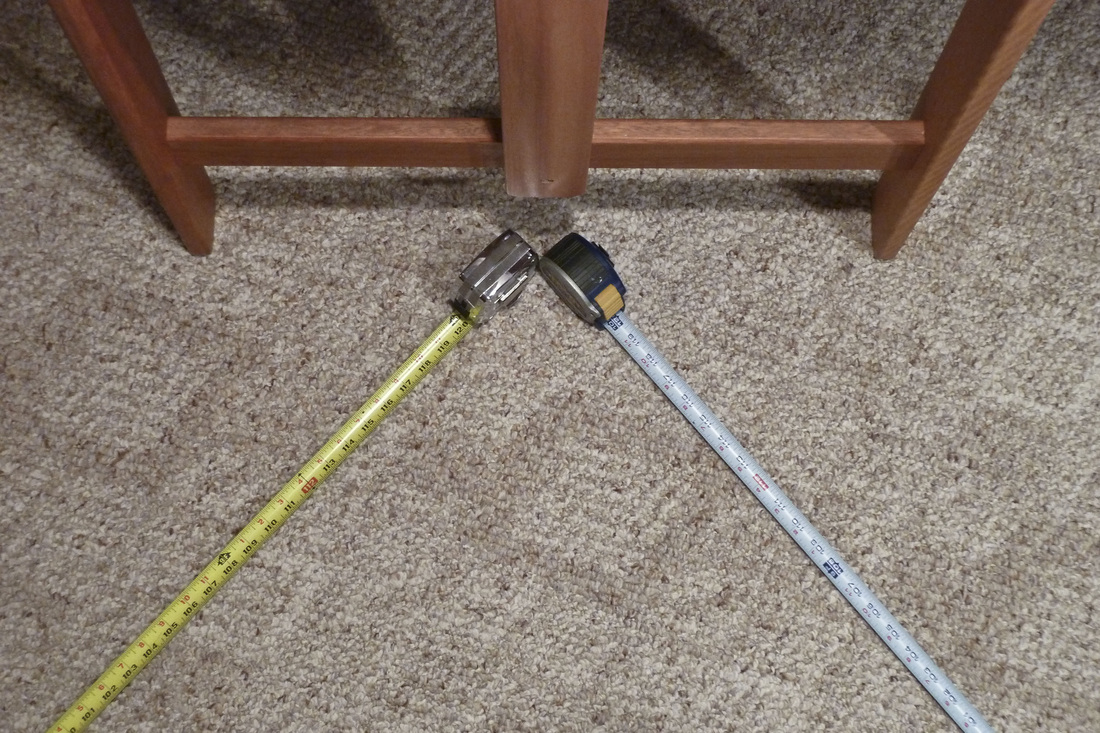
Its best if you set up in a dark windowless room like a basement. The idea here is to only allow light that has passed through the linear polarizing filters to illuminate the painting. The circular polarizer on the camera lens will not be able to filter out stray light reflected off the painting. The lights should be angled roughly 45 degrees and spaced an appropriate distance from the painting. This distance can be anywhere from 5 - 20 feet just as long as there is an even distribution of light on the painting. To check for this, use a plain white surface such as a white primed canvas. The white surface will reveal any unevenness. I usually space the lights out between 8 - 12 feet. My work isn't very large so my lights don't need to be spaced very far apart. I like to use two tape measures at the base of the easel to find the angle and distance. |
|
|
The height of the lights should match that of the painting on the easel. I good way to do this is to first secure the piece on the easel, locate the middle ,and mark that height with your hand on your torso. Then walk to your lights and adjust them to that height.
|
Camera Settings
With the camera on a tripod, in live view, focused on the painting, it's time to adjust the camera's settings for the best possible image. For this portion I'll demonstrate the settings on my Canon camera in Manual Mode. All DSLR's will have a Manual Mode for you to adjust these settings . The grid in the camera's live view can be found in the settings menu. The is a very helpful tool for squaring up the painting in the frame.
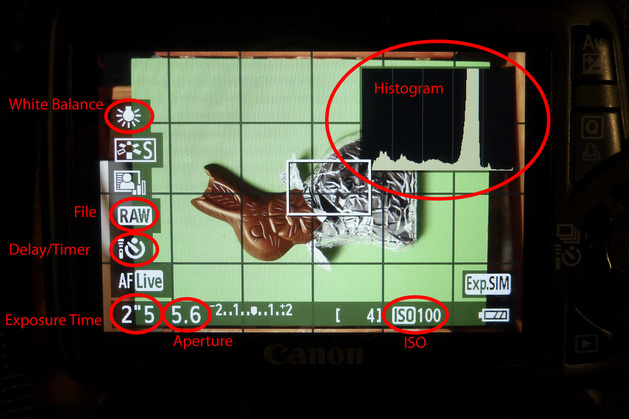
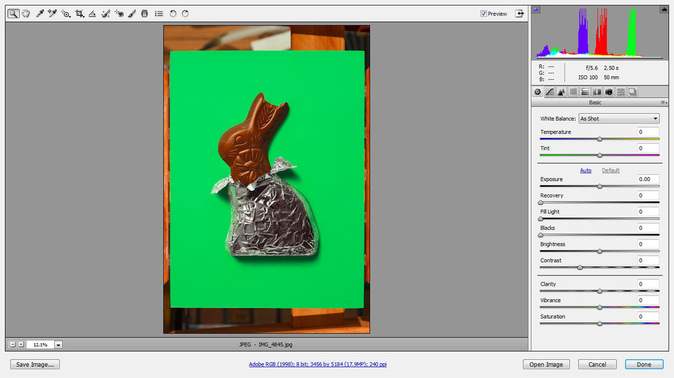
White Balance - This function tells the camera to adjust the image for either warm or cool light. This will make whites appear white rather than too yellow or blue. Since we are using warm, incandescent lights, set the camera to the tungsten white balance. Additional color balancing and adjustments can be done while editing the image later.
File - Shooting a RAW file will allow greater flexibility when editing your image in Lightroom, Camera Raw, or Photoshop. You can save the image to a space saving JPEG once the final alterations have been completed.
Delay / Timer - For the sharpest images, set the camera to a delayed exposure. This will prevent any movement from your hand affecting the shot when you press the shutter release button to take the picture. A few seconds delay will be enough time for camera shake to settle.
Aperture - As stated at the top of this page, most lenses create their sharpest image at f/5.6. This is the case for my Canon 50mm 1.8 lens so it is the only aperture I use when photographing art.
Exposure Time - This is the length at which the camera exposes the sensor to light to capture the image. Since the polarizing filters block some of the light, a longer exposure time is needed to compensate for the loss of light. In this example the exposure is 2.5 seconds. You can also bracket your exposures so once you upload them to your computer, you can select the best image.
Histogram - Histogram is another helpful feature that can be found in the camera's settings. I find this to be more accurate than the camera's light meter. It provides you with a value graph that helps you set the proper exposure time so the image isn't under-exposed or over-exposed. Large peaks on the far left means the image is under-exposed and a longer exposure time in needed. Large peaks on the right means the image is over-exposed and a shorter exposure time is needed.
|
ISO - ISO controls how sensitive the camera's senor is to light. The benefits to a low ISO is greater image quality. High ISO settings will make the image grainy and unflattering. Also, the lower the ISO, the longer the exposure time needs to be. Since the camera is on a tripod, long exposures are not a problem. Always shoot your photos with the lowest possible ISO for the best image. ISO 100 is typically the lowest.
The last step before capturing the image is to adjust the circular polarizer on the camera lens. Rotate the front part of the filter until you see unwanted glare and reflections disappear. You should see similar results as in the images below. |
|
|
|
Once you have a good photo of your work, you can also make a few detail shots of areas in the painting you want to highlight.
Editing the Image
|
If you have a good photo, the image won't need much editing. With a bit of cropping and a final adjustment for color balance, the photo should be close to perfection. A couple of enhancements that a photo can benefit from is a small boost in contrast and sharpness. A little extra contrast can sometimes make an image pop. It also improves the image when it is being viewed on large projection screens where image quality is typically low. Sharpening a RAW file is often needed as well. JPEG's come pre-sharpened where RAW files are not. The final step is to save the image. JPEGs are usually fine as long as the least amount of compression is used to retain all the image's detail. Software like Adobe Photoshop is ideal for editing your images but your camera will often come with a program to edit photos if you don't already have software.
|
|
